Dear Community,
Our goal is to support you in your daily work with Personio. For this reason, we have decided to publish a monthly series of tips & tricks.
Are you curious to know what the Top 3 Questions asked by our customers to our Service Teams in the last month? We have collected them here, along with the detailed answers to each questions, with the help of our awesome team behind the Help Center.
In order to view the answers, just click on “Show content” under each question.
What's the Difference between the Contract End Date and the Termination of an Employment?
Contract end date
If an employee has a fixed-term employment contract, the Contract End Date can be noted under Employee profile > Personal info > HR information > Contract ends.
Entering a future date as the Contract End Date is for your information and to enable the prorated leave entitlement calculation only, and does not initiate automatic employment termination in Personio on that date.
The Contract End Date also has a direct effect on the employee's Leave accrual. The vacation days for the year in which the contract ends are calculated pro rata on the basis of your Accrual policies and in accordance with the Contract End Date. If you extend an employee's contract, the number of vacation days available to them may also change.
Terminating an Employment
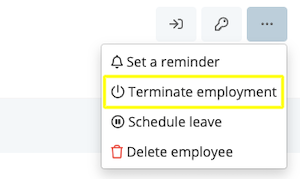
If you do not want to extend your employee's contract or wish to terminate the employment for any other reason, you can use the appropriate function to correctly enter this information into Personio. To do so, navigate in the Employee profile to the options button with the three dots in the upper right corner and then select Terminate employment.

You can now permanently terminate the existing employment contract with your employee. To do so, enter the date on which the employment ends, the termination type, the date of the last working day and optionally, specify the reason. You can also adjust the number of vacation days remaining when the employment is terminated by clicking on the pencil icon.
On the date specified as the Termination date, Personio automatically sets the affected employee profile to an Inactive status. From the next day on, the employee can no longer log into their account.
Recruiting: How do I Change my Career Page Domain Name Extension?
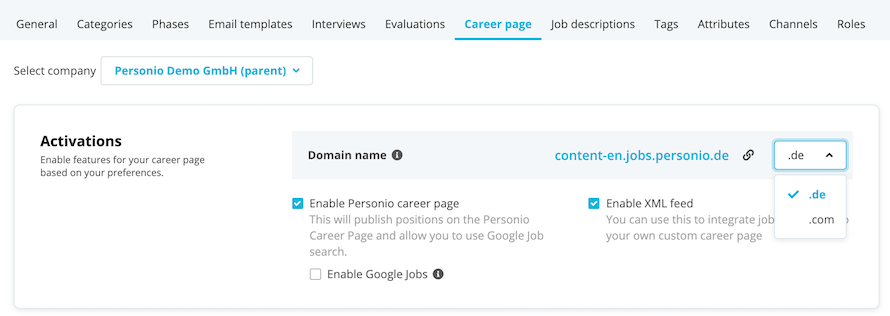
To switch from myaccount.jobs.personio.de to myaccount.jobs.personio.com, go to Settings > Recruiting > Career page. Choose the relevant company/subcompany of the career page and select the domain name extension .com from the drop-down menu.

In order to make sure your career page keeps on working after the change of the domain name extension, you will need to update the integration setup.
- First, check how the Personio Career Page is integrated into your website. This could be via a link, an Iframe or using XML. You could also be using a combination of two options (link and XML) – if that is the case, please make the changes for both integration types.
If you are not sure which type of integration you are using, please contact your website administrator. If you need additional support, feel free to contact our Service Team.
- Follow the instructions in the relevant section of this article to make the switch. Depending on how the page is integrated with your website, the switch can take anywhere from a few minutes to about two hours.
- We suggest that you get expert help for the switch to ensure that it is done quickly and seamlessly. The integration of the Career Page via Iframe or XML, in particular, requires specialist technical knowledge.
 Please verify all existing links to content on the Personio Career Page and update them if required, for example, if you link to a particular ad post or application form on your website.
Integration of the Career Page Via a Link
If you have integrated the Personio Career Page into your website via a link and also have links to the Personio Career Page within your website navigation, you'll need to update all of these links. Contact your website administrator to have this done. The administrator will only need to change the domain extension in the link. Change it from https://myaccount.jobs.personio.de to https://myaccount.jobs.personio.com.
 Ensure that all links on your website that point to the Personio Career Page are updated
Integration of the Career Page via Iframe
If you have integrated the Personio Career Page into your website via Iframe, please contact your website administrator to make the necessary changes to switch over to the new URL in the website code. This may require some programming knowledge. For further information about integrating the Career page via Iframe, please visit the Developer Hub.
The link integrated into the Iframe code, or more specifically the src attribute in the respective tag, needs to be updated. To find the src attribute, search the website code for a tag that matches the following example: <iframe src=“https://myaccount.jobs.personio.de ...>.
This tag needs to be changed and the new URL for the career page inserted: <iframe src=“https://myaccount.jobs.personio.com …>.
Integration of the Career Page Via XML
If your website lists positions that come from your Personio Career Page which have a different design, your Career page is most likely integrated via XML (and API). We recommend that you work with your developers or internal IT department to make the switch to the new URL.
Ask them to update the URL used to access the XML feed. They need to change it from https://myaccount.jobs.personio.de/xml to https://myaccount.jobs.personio.com/xml.
 There is no redirection from the old to the new URL for XML integrations. Be sure to also check whether you are using integration via link on your career page in addition to integration via XML, and if that is the case, make the necessary changes.
Changes for Postings and Promotion
After setting up the new URLs as explained above, the link for the Promote feature and the tracking links will be updated automatically. For this reason, you don't need to make any changes here. Redirection ensures that candidates will continue to be directed to your application form even if they click on an old link in existing postings.
 If you link to your postings from external websites or social networks to promote them, ensure that you use the new URL for the Personio Career Page in the future.
How do I Set Up the Integration of my Company Calendar?
The integration includes two functionalities: In HR management, all absences entered in Personio are automatically transferred to your company calendar. In recruiting, synchronizing meeting rooms and employees' calendars simplifies the scheduling of interviews. These functionalities are directly related and cannot be integrated separately.
Connecting your Calendar to Personio
The integration of your company calendar in Personio only has to be set up once; it can only be done by an employee with administrator access for your account. Cooperation with the person who administers the company calendar or an IT administrator is also required.
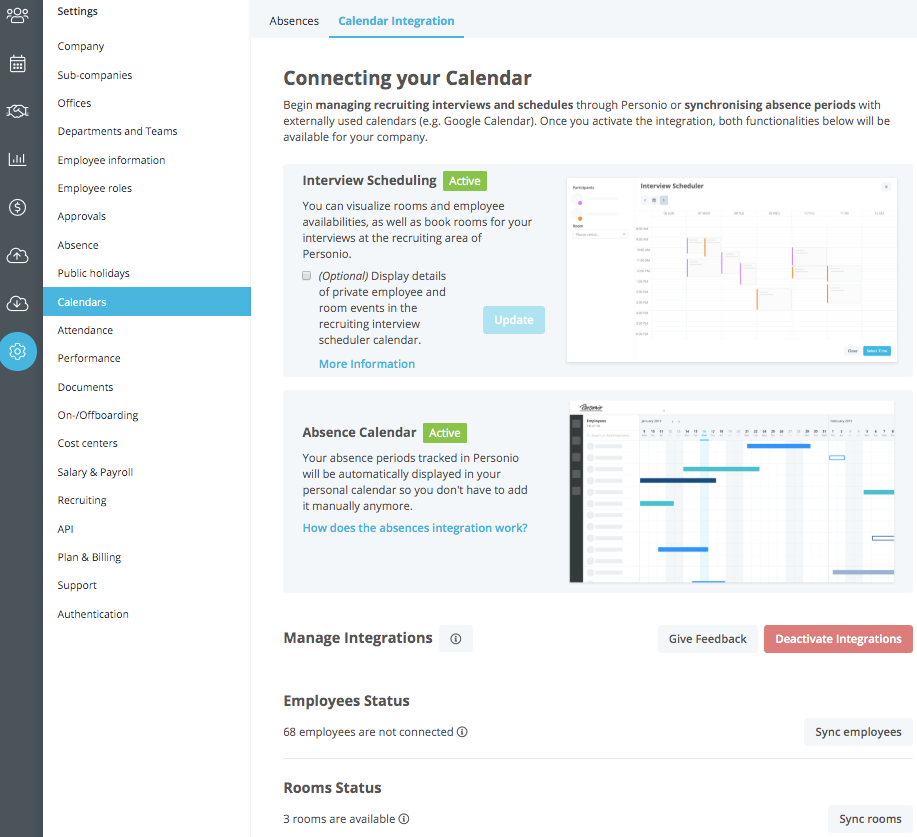
First, go to Settings > Calendars > Calendar integration, and activate the connection to your company calendar by selecting the first check box under Activate Calendar Integration to confirm that you are authorized to perform calendar integration. You also need to confirm that you are authorized to perform calendar integration for your company by selecting the second check box under Activate Calendar Integration.
When you click on Connect calendar, you are taken to a window where you can select the provider of your company calendar.
Any events in your calendar that are set to Private will by default appear as Unavailable to other users in Personio. However, if you would still like to display the details of private events in Personio, check the option Show private event details on the Personio calendar in Personio. The event details will then be visible to all recruiters when interviews are created.
Selecting your Company Calendar
Personio currently supports integration with the following three calendars:
- Google Apps
- Microsoft Office 365
- Microsoft Exchange
Connecting your Google Calendar
If you want to connect a Google Calendar, you will now be redirected to the relevant Cronofy connection page. Next, you need to install the Cronofy app on your GSuite domain. You can download the app here .
After installing Cronofy, you can proceed with the setup process by entering your Google email address and password.
 A Google Admin account is required for this. Once you have entered your login details, you have completed the Google Calendar integration.
For further information on connecting your company calendar to GSuite, please see the Cronofy documentation.
Connecting your Microsoft Calendar
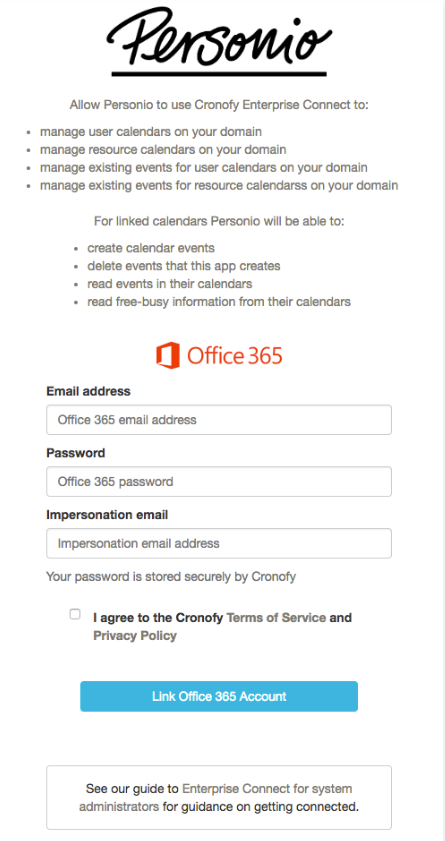
You have the option to connect your Office 365 or Microsoft Exchange calendar with Personio. To do this, select either of the two Microsoft calendars.
Next, enter your Microsoft email address and password. In addition, insert the email address of the user to whom the Application Impersonation role is assigned. This role assignment is necessary for integration with an Office product. You can assign a service account to do this, for example.

Synchronizing Existing Data
During the initial synchronization with the calendar provider, all current users and meeting rooms are authenticated. This process may take a few minutes.
Next, go to Settings > Calendars > Calendar integration in your Personio account to see how many of the employees and rooms have been successfully synchronized. From the overview, you can also disconnect the currently connected calendar from your Personio account.

Adding New Employees
When you add new employees to your company domain, they will automatically be authenticated in Personio. If there were any synchronization errors, you will receive an error message. The respective employee can then be synchronized again in Personio in Settings > Calendars > Calendar synchronization.

Prerequisites for Employees to Be Synchronized
The following prerequisites must be met so that employees can be successfully synchronized with the company calendar and Personio:
- The user's email address must already exist on the authenticated domain.
Example: The company Personio has authenticated its calendar on its personio.com domain. As a result, all users in Personio with @personio.com addresses are automatically authenticated. However, an external recruitment agent with the email address @hiringhelp.com would not be validated. - The employee must exist in the company calendar or have a company email address. If, for example, a new user is added to Personio before their account has been created in the calendar application, you will receive an error message.
 After the employee has been added to the company domain, they must be synchronized in Personio again.
Adding New Rooms
If you use Personio's recruiting feature, you also have the option to add meeting rooms for scheduling interviews. An information icon confirms that meeting rooms have been successfully synchronized.
If you add new rooms under your company's domain, you need to synchronize them with Personio by going to Settings > Calendars > Calendar integration and clicking on Synchronize rooms. This step must be performed manually and is not automated.
 You do not need a company calendar administrator or IT admin to add rooms or employees.
 For further information on managing meeting rooms in your company calendar, please see the Cronofy documentation.
 The instructions for how system administrators can grant calendar access rights can be found in the following article in the Cronofy documentation.
 For more FAQs on integrating your company calendar, please visit the Cronofy FAQ page.
How did you like our first Monthly FAQs? Please let us know your feedback in the comments, so we can make it even more useful even more in the future!
Looking forward to your replies!
Your Community Team
