Dear Community,
we all have one or the other Personio hack to make our workday a bit more efficient and organized. One of them is exactly what we use as a Talent Acquisition team: Tags! They are real lifesavers when it comes to organizing candidate profiles in a simple and clear way. But how exactly do you set Tags and what are their main purposes?
How it works:
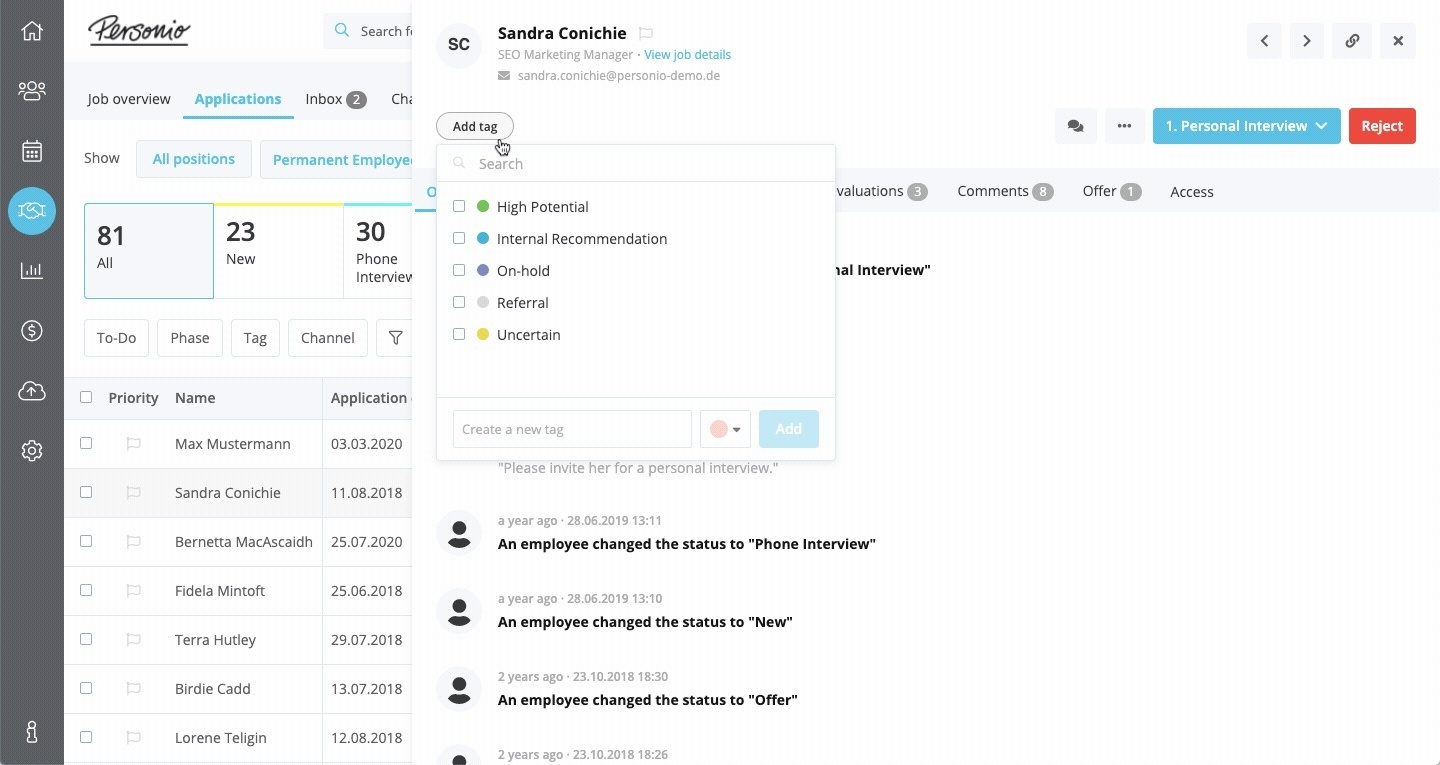
Tags can be found at the top of every candidate profile in the Personio recruiting section. After clicking the "Add Tag" icon, a drop-down list with all available options will appear first. Now you can easily select the appropriate Tag for the candidate profile.

After setting your Tags, you're probably wondering what it's for and what it will do for you. For us as a Talent Acquisition Team, setting Tags has 3 main benefits:
1. Highlight information
Tags are always very visible, as they are located directly under a candidate's name and profile overview. This means no matter what section we're working in, whether it's the Interview tab or under Messages, we always see them right away once they've been assigned to candidates.
One example of how we use Tags to highlight certain information is, for example, our internal referral program. If a candidate is recommended by one of our colleagues, we can make that visible on the candidate profile so we can use that information when we communicate with the candidate. On top of that, we can ensure that our internal referral bonus is paid to the referrer as soon as the candidate is hired.
2. Structuring the application process
Another benefit we gain from this is that we can structure our data streams better. For example, we use Tags to distinguish whether an applicant fully meets the requirements of a job (Tag "Prio 1") or lacks certain skills (Tag "Prio 2").
Tags can also be helpful in distinguishing between candidates' language skills. Some positions require additional language skills, so it is particularly helpful for us as Talent Acquisition Managers to tag languages appropriately to get a better overview of candidates' skills.
3. Filter and create personal "To Do" lists
Last but not least, we can use Tags to filter specific groups of applications to get an overview of candidates tagged with a specific tag or combination of Tags. For this you only have to:
Navigate to the "Applications" list
and in the "Recruiting" section,
use Tags as filters.
An example of this would be to filter all current referral candidates. In doing so, we can keep referrers up to date on the status of their recommendations and better predict potential costs.
For us Talent Acquisition Managers, Tags become especially interesting when it comes to creating personal To-Do lists. The personal Tags then stand for specific To-Dos. A personal invitation Tag (e.g. "Melina_is to be invited") is used to mark all candidates who will be invited after reviewing all applications for a role. Similarly, a personal rejection Tag (e.g. "Melina_will be rejected") marks all candidates to whom you have to send a personal rejection call or message.
As you can see, using Tags in the application list can give you a clear overview of the status of all candidates for whom a certain task needs to be completed. Mass actions can also be used to complete certain tasks even more efficiently.
Pro-Tip: It is even possible to save a bookmark with a specific filter within the application list in the web browser, so you can open your own list of To Do's on a daily basis.
Do you already use Tags? And what advantage do you see in them?
👉 Let us know in the comments!
Best,
Lauren Gilbert - Team Lead People Operations at Personio
